
You might have been wondering what are the technical riders all about. Maybe you’ve been asked to provide a rider to the place you’re going to perform at, or maybe you just want to see some examples of DJ riders to prepare one yourself later. Either way this is the article for you!
To ensure that you’ll be all ready and set up when you enter the place you’re performing at you have to supply a document called a technical rider to the venue management or to your manager or promoter.
What does a technical rider need to contain? What do DJ riders look like? Do you need a technical rider as a beginner? Those are the questions we are going to answer for you!
- What is a DJ technical rider?
- What is a hospitality rider?
- Does every DJ need a technical rider?
- What information should a complete DJ technical rider contain?
- Rider construction help list
- What should a professional DJ technical rider look like?
- Examples of DJ technical riders.
What is a DJ technical rider?
A DJ rider is a document that contains a list of all the gear and additional equipment that you need to be present at the venue, club or a festival for a certain show.
The additional info in the rider might contain instructions on how the devices that you will be using should be arranged in the DJ booth but also what cables do you need, what accessories you already have on you and what the venue should provide.
When you work with personal manager or a promoter usually he is the one to take care of your needs with the help of this document. The rider is handed to the venue or any other place you are going to perform at and it’s used by the house engineer to make sure that all your requirements will be met when you arrive at the place.
If you don’t work with either a manager or a promoter you will have to send your rider to the venues you’re going to perform at by yourself a few days prior to the gig.
What is a hospitality rider?
Many rider’s structures also feature a part called a hospitality rider. Most commonly it’s used when you are performing in a remote place you have to travel to and in which you’ll possibly be staying for the night or a day before or after the gig. It should contain all the info about your chosen place of accommodation and your preferred means of transport.
A hospitality rider is generally used among touring DJs. When you just start out or perform only in the city you live in or you take care of the logistics by yourself you most probably don’t need a hospitality rider or a hospitality appendix in your technical rider.
Does every DJ need a technical rider?
Even if you’re just starting out it can be beneficial to prepare a short and simple technical rider. That way when you’ll be presented with a gig opportunity you will be able to deliver your rider to the venue right away.
You might think that you don’t really need a technical rider when you’re only using a simple DJ controller for your gigs. Keep in mind however that the rider contains all the things that you usually don’t give much thought to such as all the audio cables, PA system requirements, number of power outlets you need to get your gear running and so on.
It’s crucial to have all the things you need for your show included in your rider. You should prepare your first simple rider as soon as you start thinking about mixing at local venues or clubs. Make sure your rider looks professional and that you don’t forget to include any of the things that are required to start your performance.
Even if you use just a simple controller when you want to contact a venue or a club for arranging a gig you will need a technical rider.
What information should a complete DJ technical rider contain?
The technical rider can be split in two parts for the convenience of both you and the staff at the venue.
One part can contain all the equipment that you will provide by yourself: that may be your laptop, dj controller, some accessories such as laptop stands or controller covers.
The second part would be all about the things that the venue or club should prepare for you and make it available at the place you’ll be performing at. Those things might include audio cables, power outlets, monitor speaker in the dj booth or additional dj booth set-up details.
Here is the list of all elements that your DJ rider should contain to make it usable and professional. First part is the part where you would include the things that you will provide by yourself, the second part – all the things that you need and expect to find when you arrive at the venue.
This list does not include hospitality rider elements and should be treated as a solid starting point for your very own DJ technical rider.
In brackets we have included useful comments that will help you with your specific rider arrangement.
The DJ will provide:
- Your DJ controller / Mixer and CD players (the exact name and number of the model/s)
- All the additional MIDI controllers that you use (and the non-audio cables and power supplies that those require)
- Your Laptop and power supply (remember to take count of the outlets you are going to need in the dj booth)
- Power adapters (if you are performing in a country where you need to deal with all different kinds of electrical outlets)
- Additional accessories such as: USB hubs, external soundcards, laptop stands and such (including those in the rider makes it easier for the people at the venue to plan out the dj booth arrangement, you can make it even easier for you and them by including those accessories in the visual equipment diagram)
The Venue should provide:
- Power outlets / extension cords (be sure to include the voltage and number of outlets that you require at the booth)
- Audio cables (you have to figure out the main output of your mixer / dj controller and with that in mind include the cabling that you’re gonna need to connect your gear to the PA system)
- Monitor speakers in the booth (if you decide to include this requirement you should also specify in here the cables you are going to need to connect the monitors to your mixer/dj controller and the preferred monitor placement)
- DJ booth details (you can specify how much space do you need on the table to easily fit all your equipment, what kind of lighting do you prefer)
- Microphones (useful to have one near even if you don’t use it much – especially for unexpected venue announcements)
It’s often beneficial to bring your own spare audio cables even when you already requested them from the venue. There are situations in which either by mistake or by lack of attention someone overlooks some of the cable requirements or the provided cabling refuses to work. In those cases it’s good to have your own cables with you as those usually don’t take up a lot of space.
What should a professional DJ technical rider look like?
The best practice is to design your DJ rider document as following:
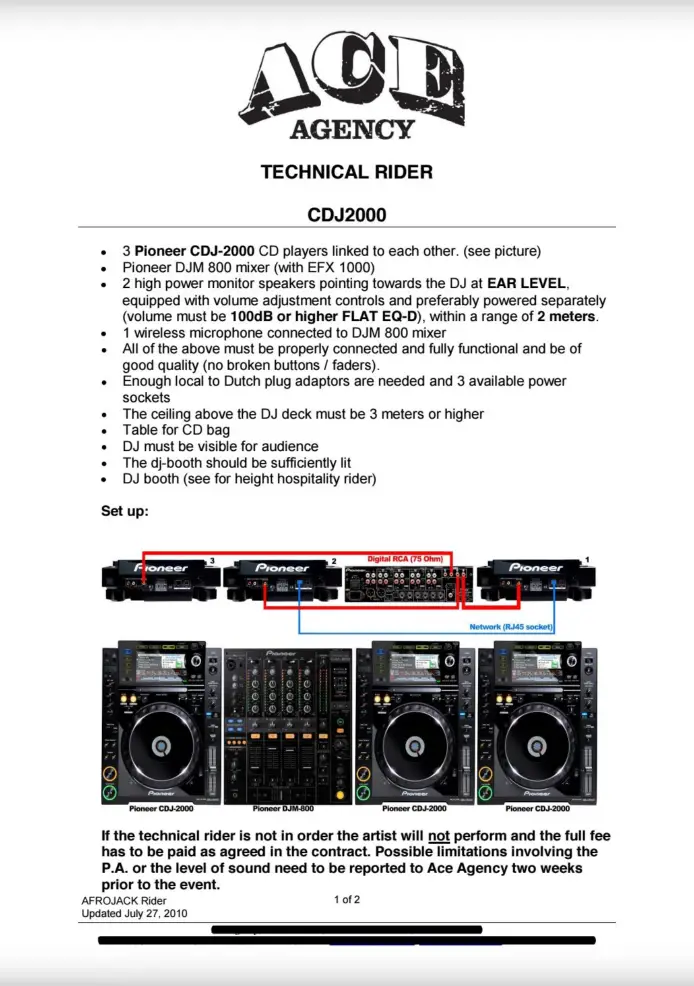
On the top of the page you can have your logo alongside with your DJ stage name and the clear text “TECHNICAL RIDER” that makes it easy to identify the document’s purpose.
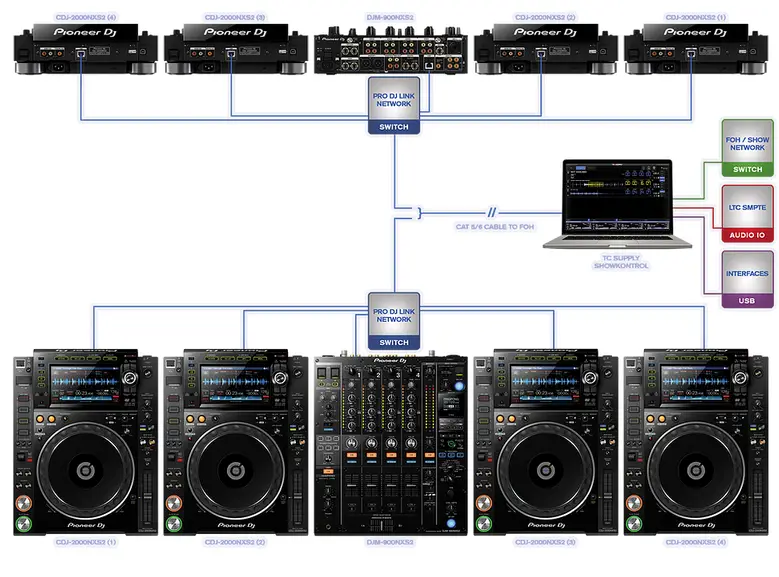
Below you can place a simple diagram that shows how all the pieces of equipment should be arranged in the dj booth (and how the cables should be plugged in) (see the examples in the last section).
Below this you can start writing out your requirements in a form of a list (this way it will be both easy for you to write out and for the people responsible for preparing the venue to set up the place).
Present the list of equipment you are going to provide and the list of things you are expecting to find when you arrive at the place.
Don’t forget to include your detailed contact info somewhere on the page. When some requirements cannot be fulfilled it’s a common practice for the venue management to communicate directly with the DJ or the DJ’s manager.
Ideally the technical rider should be a single one sided page. If you have more equipment or your setup is more complicated you can of course go beyond this simple form factor and extend it to a few pages.
Make sure that the document is easily readable and the included schematics or diagrams easy to understand! This piece of paper will most likely be the only way you will communicate with the in house audio engineer. Make his job easier and save yourself the hassle by checking the document twice for errors and mistakes.
Here are some examples of DJ technical riders:
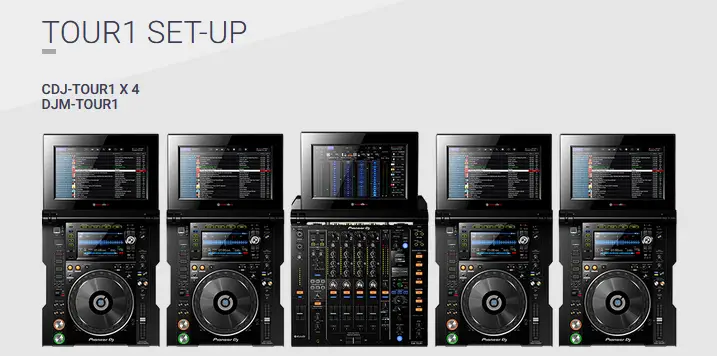
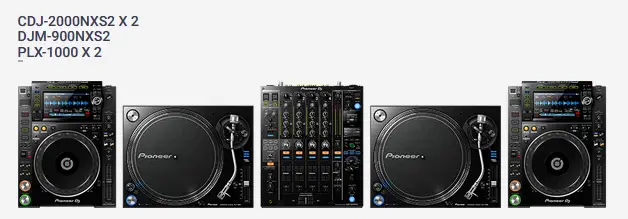
Pioneer DJ on their official website provides great examples of professional good looking DJ technical riders albeit only for their Pioneer equipment setups. Nevertheless those alongside with our list can be a great starting point for making your own personalized DJ rider. Check the example Pioneer DJ riders here.
An example technical rider from Pioneer DJ official website:
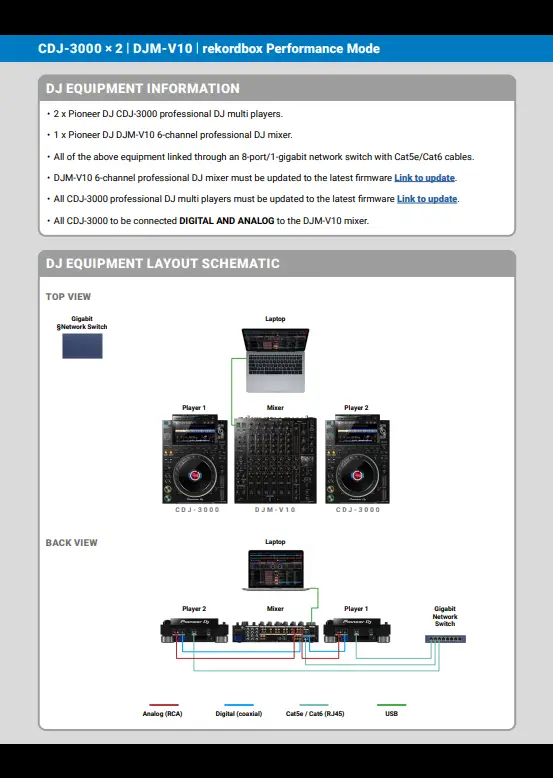
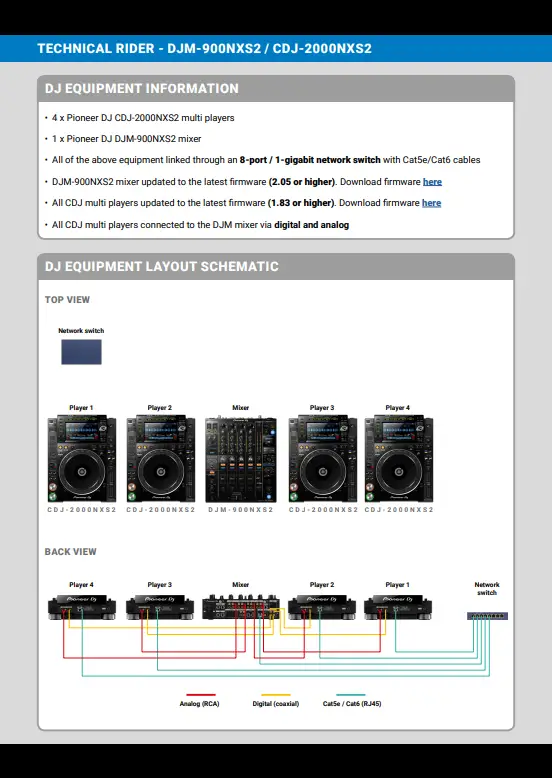
Those riders are not divided in two parts (things brought by you and the things that are to be present at the venue).
In most cases if you use your own equipment it’s better to split the rider equipment list into two parts for clarity as we did in our example list earlier.
Conclusion:
There are no strict rules that must be followed thoroughly when making your technical rider. You don’t necessarily have to split your requirements in half as we did in our list, you also aren’t bound to any visual form and you can certainly come up with your own ideas in how to convey your needs to the venue management. While preparing your rider remember that the most important thing is for this document to be clear and easily understandable by both the house engineer in the venue and the club management. When it’s built correctly it will save you many worries that come with performing for the first time at an unknown place.
Check out also: How To Care For Your Vinyl Records – The Ultimate Guide
Main photo: Gaby Tenda