
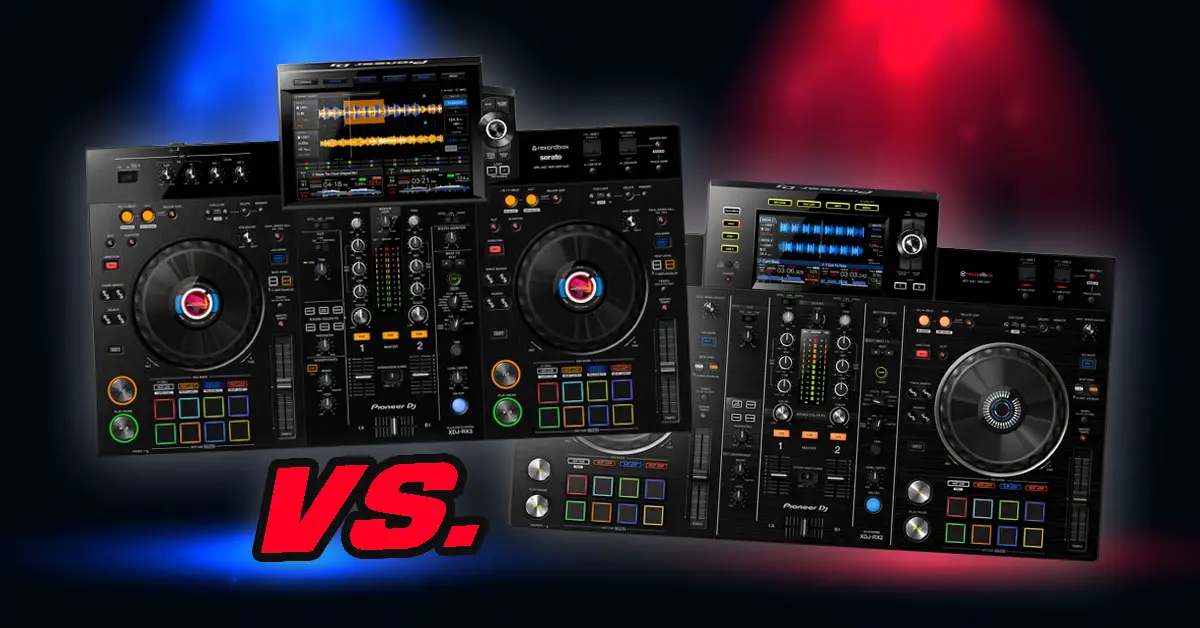
Pioneer XDJ-RX2 vs. Pioneer XDJ-RX3. Which features got updated? Is the upgrade to XDJ-RX3 worth your money? Let’s get to know the new XDJ-RX3 all-in-one DJ system and compare it to the previous XDJ-RX2 model.
You might also like: Pioneer DDJ-1000 vs. XDJ-RX3 (New Comparison)
This web portal is reader-supported and is part of the AliExpress Partner Program, Amazon Services LLC Associates Program, eBay Partner Network, and Guitar Center Affiliate Program. When you buy using links on our site, we may earn an affiliate commission.
| Specification |
|---|
The screen on the XDJ-RX3 (10.1-inch display)
XDJ-RX3 features a 1280×800 10.1-inch touch display and comes with GUI that you may already know from the new Pioneer CDJ-3000 players – the user interfaces are almost identical.
The screen is a big step up from the XDJ-RX2 7-inch display, now the screen can fit much more information, features new convenient navigation options and additional FX controls.
Navigation buttons and category browse buttons are still present on the device so you are able to select your tracks without using the touch controls if you wish to do so.
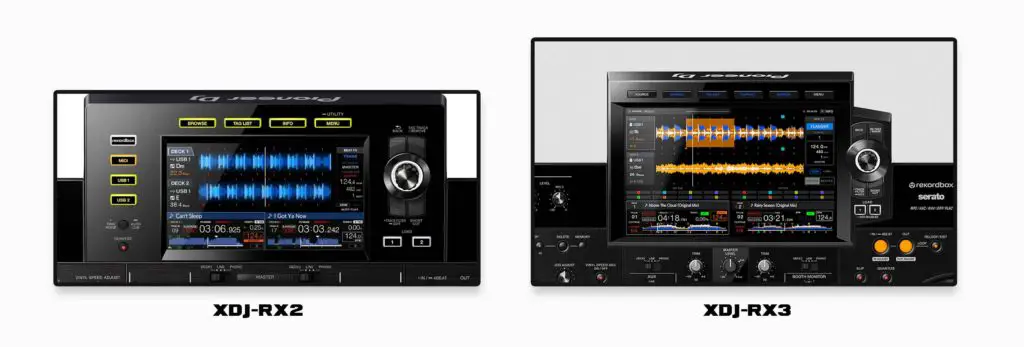
On the XDJ-RX3 you can additionally preview the tracks by activating the cue button on the bottom left side of the mixer and then pressing and holding on the track’s waveform in the library view. This works much like track preview on the CDJ-3000.
You can use the needle search feature by sliding your finger across the currently loaded track waveforms in the bottom part of the XDJ-RX3 screen.
This is a resistive touchscreen, so it does not support multitouch or smartphone-style gestures such as pinch-to-zoom or smooth gesture scrolling. You cannot for example smoothly scroll through your playlists or pinch and zoom the waveform view (although the waveform zoom itself is accessible via the track selection encoder).
You might also like: Top 10 Best DJ Controllers With Built-In Displays
The middle section of the screen on the XDJ-RX3 can either show you the performance pad functionality details in the status mode or let you control audio FX in the beat FX mode.
Once the beat FX mode is on you are able to store up to 4 customized beat FX presets in a bank that can be edited using the beat FX mixer section.
On the right side of the middle screen section you will see the X-pad section – this actually works the same as the X-pad on the DJM-900NXS2 so it lets you control the beat parameter of the engaged effect by moving your finger across the beat division slider.
More Beat FX & Sound Color FX available on the XDJ-RX3
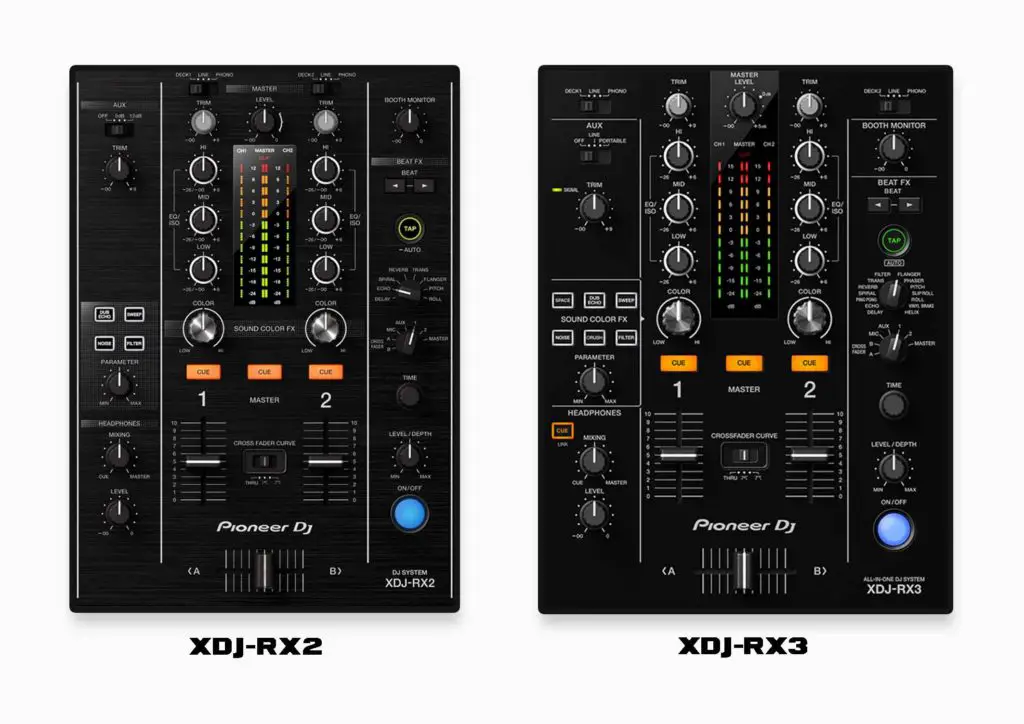
The XDJ-RX3 features updated Sound Color FX and Beat FX modules which now directly resemble those present on the XDJ-XZ / DJM-900NXS2 mixer.
There are 6 Sound Color effects and 14 Beat FX available on the XDJ-RX3 vs. 4 Sound Color effects and 8 Beat FX on the XDJ-RX2.
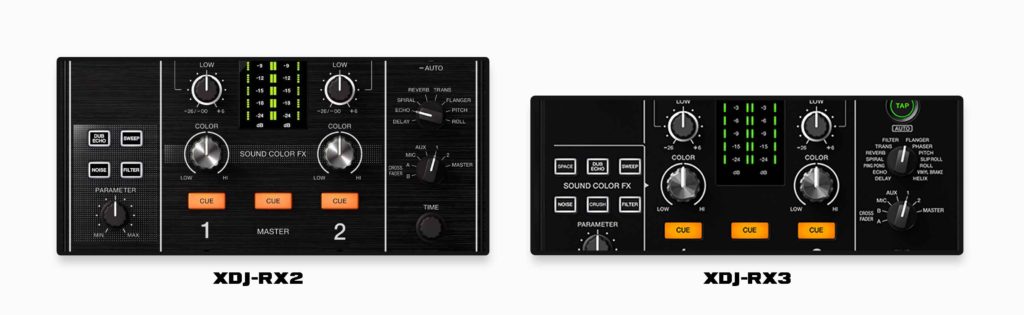
Space and Crush FX are the Sound Color effects that weren’t present on the XDJ-RX2 which as we’ve pointed out featured just 4 basic Sound Color effects and 8 Beat FX.
3-band waveforms view
The XDJ-RX3 lets you make use of the 3-band EQ waveforms that we know from the CDJ-3000 player series with the option to change back to the original blue / RGB waveform view in the settings.
One thing to note is that while you can zoom into the waveform on the XDJ-RX3 the final close-up view of it can be quite blocky and low quality in general – this is perhaps because of the kind of graphics chip used in the device.
This is by no means a large disadvantage as it doesn’t pose problems during normal usage of the device, it’s just something to keep in mind.
Jog wheel differences
The XDJ-RX2 and RX3 both feature capacitive jog wheels but the XDJ-RX3 benefits from the LCD screens built into the platters.
The XDJ-RX2 jog wheels feature only the same platter lights that are present on previous DDJ/XDJ series of Pioneer controllers – that is LED lights capable of displaying only a simple needle indicator.
The size of the jog wheels is the exact same on both units.
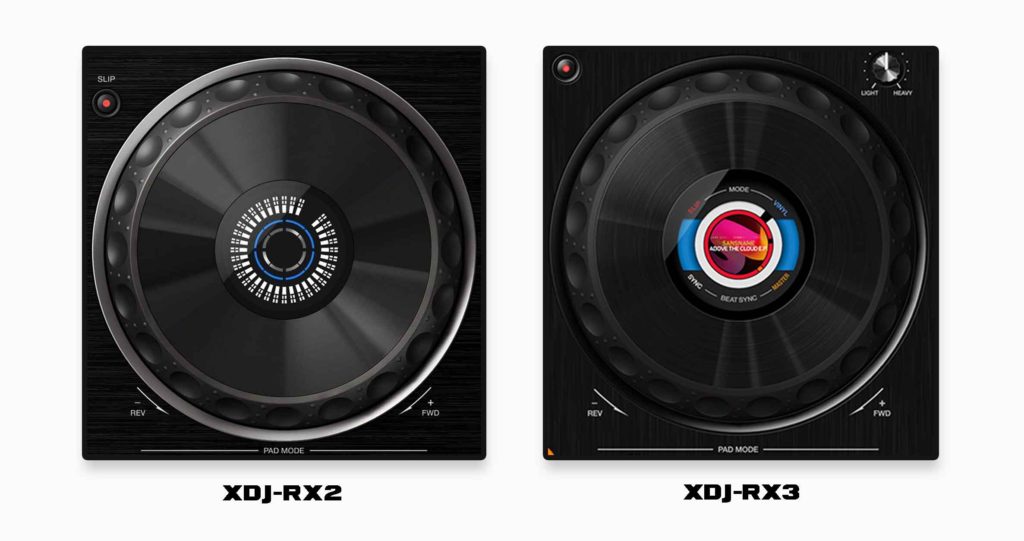
The jog wheel displays on the RX3 can show you if the sync or slip modes are on, whether the jog wheel is in vinyl mode or not, they feature a needle position indicator, cue position markers and they will also show current active loop length values, however they cannot display the current track’s BPM or key like the full sized jog wheels on the DDJ-1000 or the XDJ-XZ which is a great shame.
You can however customize the logos displayed in the center of each jog wheel supplying 800x800px jpg files of your choice on a USB stick.
You can easily differentiate between two different USB sticks this way supplying one image on one USB drive and another on a second USB device.
These jog wheels closely resemble the ones used in the Pioneer DDJ-800.
XDJ-RX3 now features the jog wheel feel/tension knobs on each of its decks allowing you to adjust each jog wheel’s tension separately.
| Pioneer XDJ-RX2 on Ebay: |
| Pioneer XDJ-RX3 on Ebay: |
Additional performance pad modes on the XDJ-RX3
Both controllers feature 8 RGB backlit performance pads. The XDJ-RX3 pads look a bit different as now their rim is fully lit up instead of them having just a black border all around as seen on the XDJ-RX2.
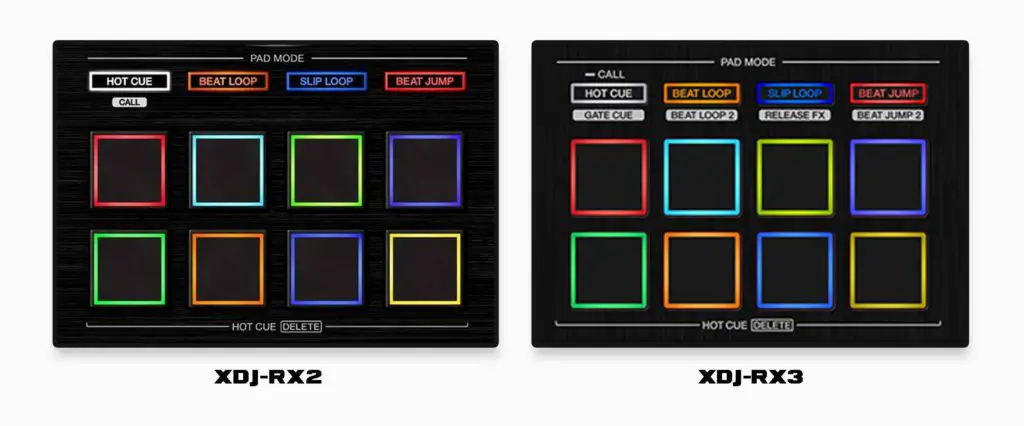
Also, the XDJ-RX3 features 4 additional pad modes for you to utilize:
Pioneer XDJ-RX2:
- Hot-cue – a standard hot-cue mode
- Beat Loop – same as Auto Loop feature, different loop length access controls (1/16 beat to 8 beats by default)
- Slip Loop – the same as Roll mode on other Pioneer DJ controllers – triggers momentary loops as long as a pad is pressed down (1/16 beat to 2 beats + 1/3 and 3/4 beats)
- Beat Jump – allows you to jump through the track forwards and backwards by 1/2/4/8 beats quickly and in sync
Pioneer XDJ-RX3 (new pad modes in bold):
- Hot-cue – same as XDJ-RX2
- Beat Loop – Auto Loop (1/4 beat to 32 beats by default)
- Slip Loop (Roll) – same as XDJ-RX2
- Beat Jump – same as XDJ-RX2
- Gate Cue – after the initial cue press, the controller will instead of simply playing the song, play it only for as long as you’re holding the button down (This is how basic hot-cues work initially with Serato DJ software)
- Beat Loop 2 – Features 8 additional irregular timing loops like for example triplets
- Release FX – 8 new audio FX that work in a momentary trigger mode (are active as long as the pad is pressed down)
- Beat Jump 2 – with smaller beat divisions available
Each of the additional pad modes is activated by pressing the chosen pad mode button twice.
The Release FX performance pad mode
All the Release FX (pads 1-8 in order):
- Vinyl break (turntable stop effect)
- Short backspin (vinyl backspin effect)
- Echo out (fixed 1 beat loop slowly decreasing in volume)
- Mute (mutes the channel audio output completely while pressed down)
- Long vinyl break (slightly longer vinyl break effect)
- Long backspin (equal to several platter rotations)
- Buildup (sets up a loop progressively changing its length from 1 to 1/16 beat and then releases the effect automatically)
- Ducking (fades the truck out by ducking the audio on each following beat)
These are not post-fader FX – if you for example trigger an echo effect by using a pad and then try and move the active channel fader down to 0db you will simply cut the echoing audio short.
The mixer section
The mixer on the XDJ-RX3 now features all the audio FX that are present on a XDJ-XZ series controller or the Pioneer DJM-900NXS2 mixer while the XDJ-RX2 has only a cut-down version of these.
Mixer plate on the XDJ-RX3 now has a black finish which nicely complements the brushed aluminum finish on each of the device’s decks.
The controllers do not support pro-link connection (no Ethernet ports) so you won’t be able to connect CDJ players to your XDJ setup in any other way than through the audio mixer. Also unfortunately both XDJ-RX2 and RX3 are not DVS compatible.
An important thing to add is those controllers do not feature key shift or key sync options in standalone mode. This means that you won’t be able to control the key of your tracks in any way.
Audio outputs / XDJ-RX3 3.5 mm aux input
In terms of audio outputs there are no differences between the two devices other than on the XDJ-RX3 you have an additional 3.5 mm jack portable audio input that you may use for connecting an audio device like a smartphone or a laptop as an additional audio source.
You might also like: Audio Jack Sizes – Inches To Millimeters – A Quick Guide
The countdown function & the repeat mode on the XDJ-RX3
On the XDJ-RX3 you are able to set up a countdown timer by using the in-built timer app.
It may be useful for some but one problem with this is that the timer doesn’t really display any kind of notification when the countdown is over. Other than that it’s a welcome addition nevertheless.
The repeat mode present on the XDJ-RX3 enables you to set a single track or a playlist to play on repeat. This way you can either leave your DJ booth for a while while the music is still playing – this may be useful for one example during soundchecks.
Software compatibility
Both the XDJ-RX2 and XDJ-RX3 are Rekordbox 7 Hardware Unlock devices. The XDJ-RX3 also supports Serato DJ Pro control, while the XDJ-RX2 does not.
Should you upgrade from the XDJ-RX2?
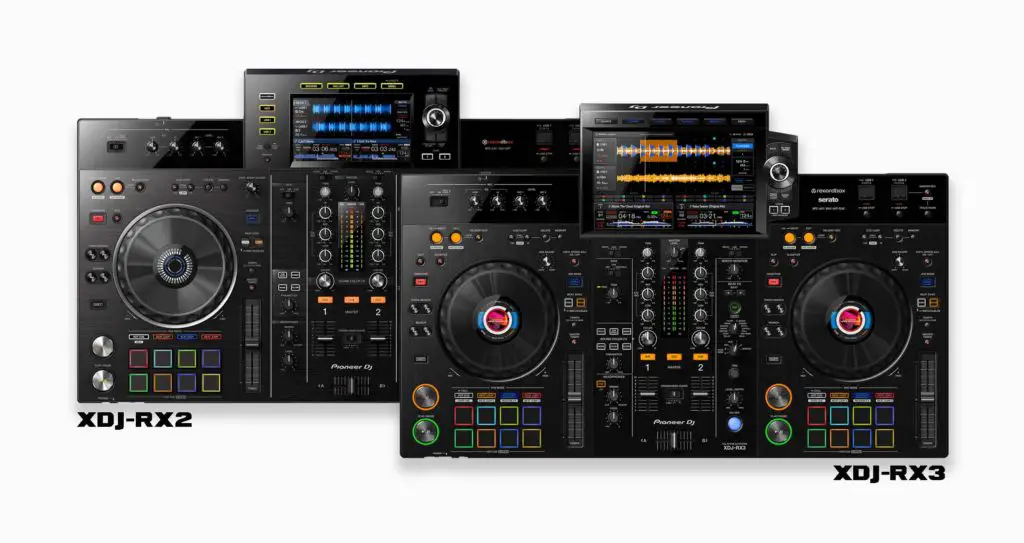
The XDJ-RX3 is a great improvement from the XDJ-RX2 but the main parts that are important in this upgrade are: the screen and GUI based on the CDJ-3000 series, full audio FX set taken from the DJM-900NXS2 mixer series and the extended performance pad functionality.
For an XDJ-RX2 owner, the RX3 upgrade is mainly about the much larger screen, expanded FX and pad modes, jog displays, and improved browsing. The basic 2-channel standalone workflow remains very similar.
The XDJ-RX3 is still a capable 2-channel standalone option, although newer systems now include models such as the AlphaTheta XDJ-AN and XDJ-AZ. On the Denon side, the current 4-channel alternative is the Prime 4+.