
Step-by-step Simple DJ Gear Basics a.k.a. What do all those buttons actually do? If you haven’t used a DJ controller yet, plan on getting one or you are already waiting for your brand new DJ gear to arrive you might want to check out this article! Here we provide a short yet profound explanation of most common DJ controller functions that you’re bound to find on your device.
The article features images that will help you locate every element, button and knob that will be described in here. Those elements look very similar between different devices so hopefully this will help you locate them on your own DJ controller.
Also, we have an extensive article about DJ gear for beginners – feel free to check it out here: What Equipment Do You Need To DJ?
– Play/Pause | CUE Button
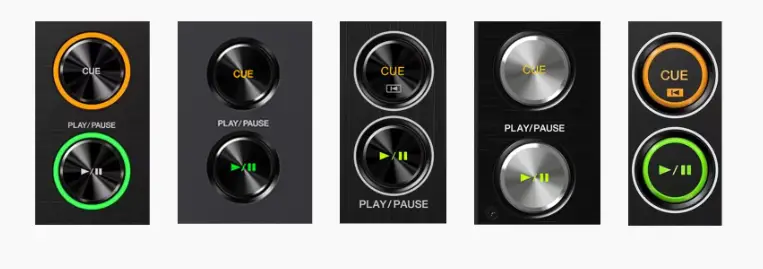
The simplest and seemingly most obvious control button on a DJ controller sometimes tends to confuse beginner DJ gear users.
While the play/pause button works just as you would expect playing the track on the first press and pausing it on the second the CUE button acts a bit different.
The CUE button after a first press will set a starting point for the track. The second press of the CUE button will start the playback but it will last for only as long as you will hold this button down. To CUE in (or simply – play) the track using the CUE button first press the CUE button and then while still holding it press the play/pause button. The track will now continue to play until it is stopped by either the CUE button press (a new CUE point will be set) or the play/pause button (no new CUE will be set).
CUE button is useful when you’re preparing a transition and you want to start the next track (for now only in your headphones) in tempo with the already playing track. First you would set the new track’s tempo using the pitch fader then you would try and tap on the cue button in time with the playing song to make the beat of the track playing out of the speakers match the beat of the track in your headphones. Then you would be able to correct the tracks tempo using the jog wheel and rise up the volume fader on the mixer to make the new track audible for the audience.
Sounds complicated? We will cover all the DJ gear elements in bold and more later in this article to try and make it simple for you so stay tuned!
DJ software often allows you to configure a vinyl break sound effect associated with the press of the play/pause button. When the break effect is turned on and you’ll press the play/pause button the track will slowly come to a halt just as it would on a vinyl record player. In most cases you can set the break effect duration in your software settings.
– Performance Pads | Hot-cue Pads/Buttons
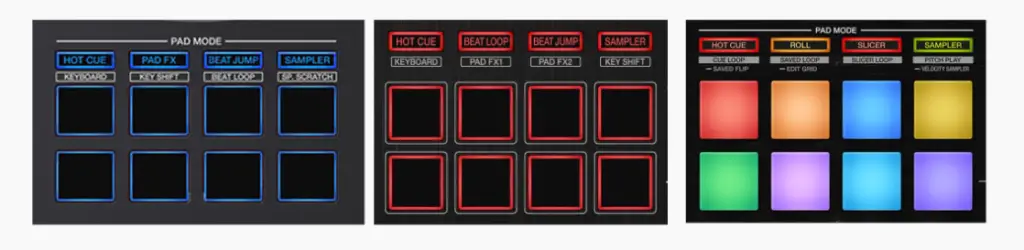
On almost every DJ controller you will find performance pads. Those soft pads are generally either buttons that can be pushed all the way down and will have a certain “click” to them, or buttons that won’t “click” at all and are only touch-sensitive.
For example a MIDI controller Novation Launchpad S pads function as push buttons, while in a Pioneer DDJ-SX2 DJ controller the pads are touch-sensitive surfaces and won’t make a “click” sound.
Some performance pads are also capable of velocity detection (ex. while using the pads with a sampler you will be able to touch lighter for a quieter sound and harder for a louder sample playback).
Usually the main function of performance pads in a DJ controller is to let DJ use hot-cues. Hot-cues are one of the most useful DJ controller features.
Hot-cue is a button function that allows the DJ to come back to a selected point of the currently playing track. The first press of the hot-cue button sets a hot-cue point at a current track position, the second press will make the track play from that specific moment. Hot-cues can usually be deleted by holding down a shift button on a controller and then pressing down a hot-cue point that you want to remove.
A common thing is to put performance pads mode buttons over the pads section. Those mode buttons are used for changing the pads behavior and allow the DJ to control many features other than the hot-cues using the performance pads (ex. a sampler, slicer, loop roll controls, various audio fx etc).
– The SYNC Button
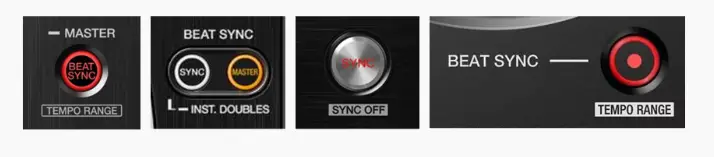
The SYNC button lets you synchronize the tempo of played tracks so that you can do a clear transition between them. Using the SYNC button is a direct alternative for using a pitch fader and the jog wheel/platter to beatmatch (sync the tempo of two songs) by ear – this should generally be the first skill to learn when beginning your DJing journey.
A sync button is present on most modern DJ controllers but you won’t be able to find it when using a classic analog vinyl setup or certain older non-linked Pioneer CDJ setups.
Over the years many controversies have arose around using the sync function present on modern DJ equipment. The basis of this conflict is the mass of new beginner DJs who tend to use the sync function for mixing without learning manual beatmatching first.
The automatic tempo sync function is not always reliable and will not work in many circumstances, you should definitely learn how to beatmatch by ear early on in your DJ journey to avoid embarrassing mistakes and confusion.
On some controllers you will also find a KEY SYNC button. This button will synchronize the musical keys of the two playing tracks. This is a more advanced function and it may prove itself useful while engaging in harmonic mixing – mixing with keeping song keys in mind for better transitions and flow.
– The Loop Section
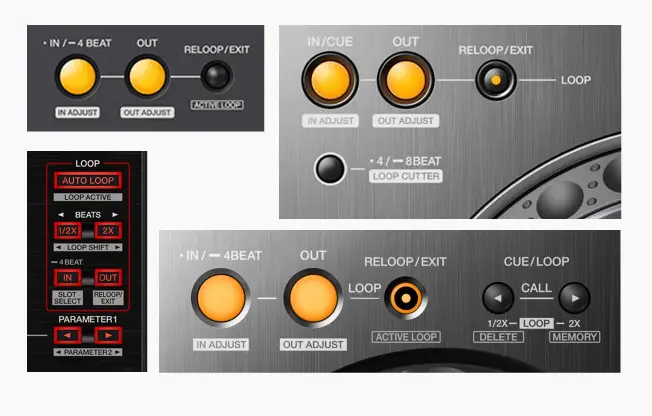
On every controller you will find the loop section that is used to control audio loops on a playing track.
Usually there is one loop section for each deck present in your setup.
In this section you will find buttons for starting and ending an audio loop and some additional buttons to let you control the looped audio further.
Those additional controls often feature: cutting the loop in half/lengthening the loop, auto looping (by a number of bars selected inside the software), exiting the loop or controlling the loop edges using the jog wheel/platter for loop range fine tuning.
Using any kind of auto-loop feature requires you to pre-analyze the audio tracks you are planning to use the auto-loop on in your DJ software (this is usually done automatically when you open a track on one of the decks). An analyzed track will have a beat-grid that will allow you to use automatic loops.
– Song Selection Controls
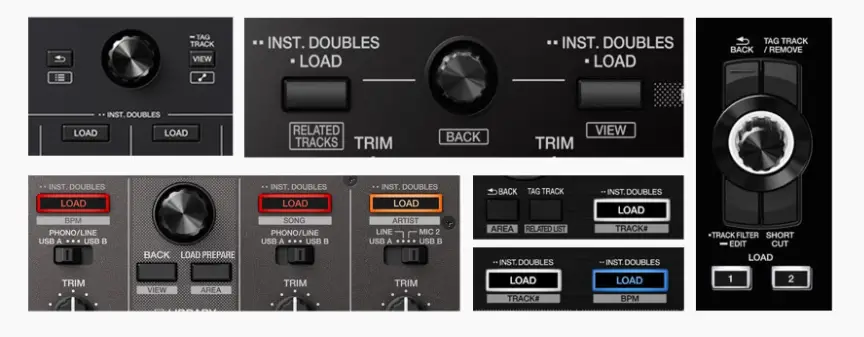
Every DJ controller is bound to have some kind of music library controls or a song selection section. This section will most often consist of an encoder knob to move through your music library and buttons corresponding to each deck/mixer channel for loading the tracks onto them.
Generally every DJ controller will have some library control section built in, some of them will even feature LCD touch screens to assist you with the track selection process and make it more efficient.
– The Mixer Section
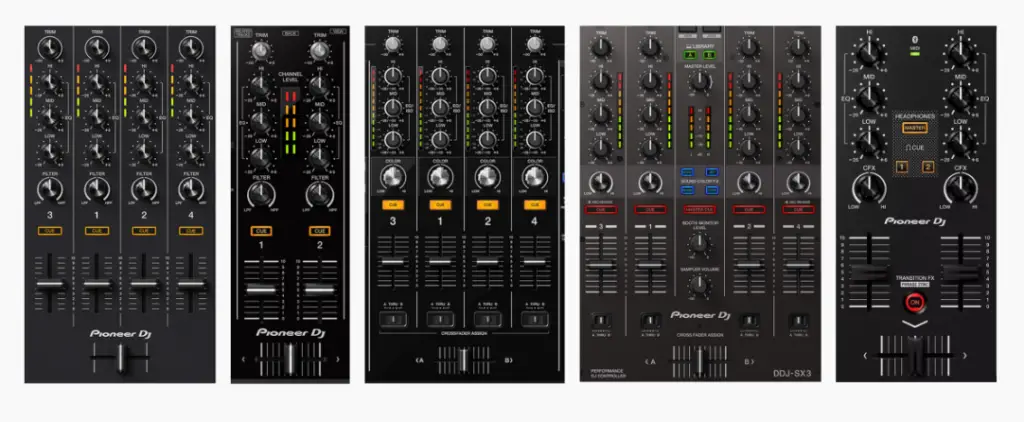
Hands down the most important and complex section of any DJ controller. The mixer is your main tool that you’re going to use when doing transitions between the tracks played on the decks.
The two most important DJ mixer elements are mixer faders and the equalizer.
Mixer faders are just the volume controls of each mixer channel corresponding to each available deck. Many times you will find two kinds of additional controls near the mixer faders: the source switches (for choosing the type of audio input for every mixer channel – useful when you use your software alongside with an external microphone or an analog turntable) and the channel assignment controls (for assigning each mixer channel to the deck of your choice – when you have more than 2 decks on your DJ controller).
The dj mixer faders will generally be harder to move than the crossfader you see at the bottom of your mixer. The crossfader is mainly used for scratching and it’s made in such a way that enables the DJ to move it quickly and without delay.
Why Is My Crossfader Loose? – DJ Equipment Info
There are some mixing techniques that make use of the crossfader for doing track transitions (and you might be used to this process from all kinds of DJ mobile apps and desktop software you used just with a computer mouse) but in general the most reliable way to do a transition is to do it with the help of the mixer faders alone (trust us on this one).
Other things that you will find here are the cue/headphone buttons for each mixer channel. Those buttons when pressed allow you to hear the track on the selected channel playing in your headphones – even when the mixer volume faders are down and the track isn’t audible for the audience! This function is essential for mixing – it allows you to beatmatch, search through new songs, set up cue points and loops and all that without disturbing the main audio playback.
The mixer section will in many cases include additional elements such as the trim/gain knobs that let you fine-tune each channel’s volume, the master volume control knob that is responsible for the final output volume of the device and the booth output knob that controls the volume of your DJ booth monitor speakers alongside with the headphone volume knob with a similar purpose but for headphones.
Next thing that also may be present on newer controllers such us the DDJ-1000 or DDJ-1000 SRT is an audio FX section. On some controllers it’s placed on individual decks, on some it finds its place on the mixer plate.
– Audio FX Section
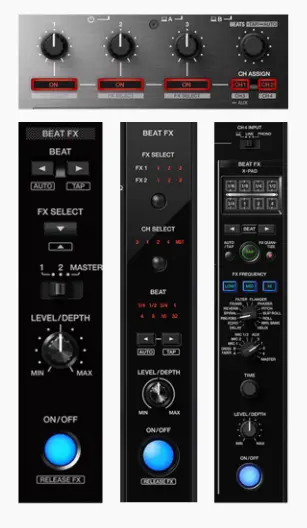
As we’ve said before the audio FX location is generally different for every DJ controller design. A common practice is to place it on each deck separately or – in a Pioneer DJM mixer fashion place it on the side of the mixer section.
The audio FX section is almost always fully customizable from the software level. You can choose from many audio effects that your DJ software offers, those often include flangers, different kinds of reverbs and delay, loop transforms, bitcrushers and so on. There is always a lot to choose from.
Some Pioneer DJ controllers also feature a so-called “sound color” section. Those type of audio effects are a bit different – they do not only change the playing audio, rather they can also generate additional sounds through a special synthesis engine (white noise, jet risers, horn sounds etc.)
If you like to have more FX options on hand then we can recommend the Pioneer DDJ-1000 and the Pioneer DDJ-1000SRT as professional DJ controllers that make use of the sound color FX section.
You are presented with powerful tools but please be sure not to overuse the audio FX – it is one of the most common and unprofessional beginner DJ mistakes that we covered in one of our articles.
– Jog Wheels/Platters
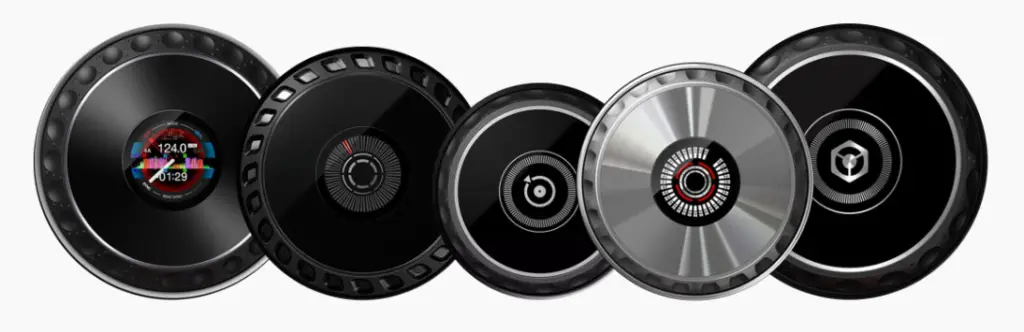
There are two purposes that the DJ controller jog wheels/platters serve. The first one is track position control – using the jog wheel you are able to position the track in a convenient way to mix it in, set up a loop or a hot cue.
When moving the jog wheel while touching its surface with your fingers you will control the track’s position in a similar way you would control it when moving a vinyl record on a turntable. This is useful not only for scratching but also for moving around the track.
When moving the jog wheel’s edge the track won’t move aggressively and by a huge amount like it did when you touched the jog wheel’s top part – this time it will only move by a minimal amount so you will have to turn the jog wheel’s edge many times to move the track by just a second. This is useful when beatmatching. When two tracks with the same tempo are played together you will be able to fine-tune their tempo alignment by moving the edge of the platter and momentarily speeding up or slowing down the playback slightly.
Some controllers also have a “vinyl mode” button on them – deactivating the vinyl mode will make the whole jog wheel surface act on touch just like the edge did in a previous example – you wont be able to scratch or quickly move through the track with your hands movement, you will just be able to fine-tune the tracks tempo using the top part of the platter.
Nowadays you are also able to find DJ controllers that feature motorized platters for a better, more vinyl-like experience. The controllers with turning platters will generally have additional options for modifying the jog-wheel torque and feel. One of the best choices in that terms is the new RANE ONE from Rane.
If you are planning on learning how to scratch using vinyl records and you would like to control the songs playing from your laptop with classic turntables be sure to check out Digital Vinyl Systems (DVS in short) – we have an article explaining DVS if we got you interested!
DVS And Timecode For DJs Explained. (A Simple Guide)
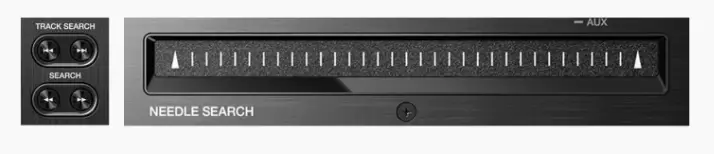
On your DJ controller you might also find additional track navigation controls. As we’ve said before you are able to move through your tracks with the use of the jog wheel but at many times you will need a quicker way to jump through the song than turning the platter a dozen of times.
Many controllers offer fancy and convenient ways of navigating through the tracks such as – touch panel track position sliders (DDJ-SX series), track search buttons (DDJ-1000) or beat jump functionality build in performance pads (which allows you to jump through the truck by a selected amount of bars).
– Tempo Fader/Pitch Fader
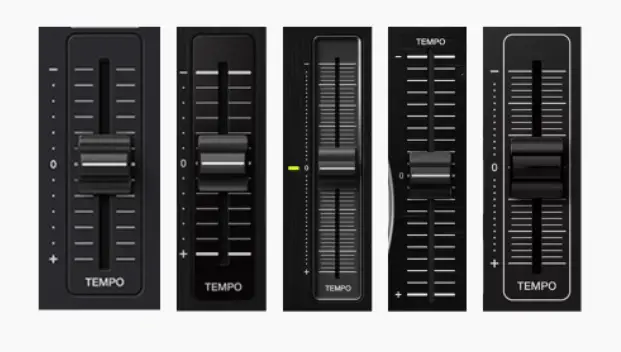
Tempo fader is pretty self explanatory – it’s present on each deck and it lets you change the tempo of the track shown in BPM (Beats per minute) which is shown inside of your DJ software (or the controller display if it has one) usually with an accuracy to two decimal digits.
Using the tempo fader you are able to make precise changes to the track’s tempo that enable you to beatmatch two tracks and make a smooth transition between them using primarily a jog wheel, the equalizer and the mixer faders.
The tempo fader’s default position is at its center where it “clicks” into place. When moved either up or down it lets you gradually slow the track down or speed it up.
Many controllers feature an additional KEY LOCK button placed somewhere near the deck’s tempo fader. Every tempo change by default also changes the track’s pitch – this means that if you speed up a song too much you will get a weird high-pitched chipmunk vocal effect and when you slow it down too much you will reach an equally bad outcome. The purpose of the KEY LOCK button is to mitigate this issue by digitally keeping the original key of the song throughout all your tempo changes. Generally it’s better to leave the KEY LOCK functionality on when it’s present.
Keep in mind that huge tempo changes (starting around +/- 5 BPM) without the key lock feature may sound bad especially when the track contains human vocals and even when the key lock is left on huge tempo changes generally should be avoided.
Some smaller DJ controllers feature a non-full sized tempo fader. Keep in mind that the small tempo faders can be harder to operate and there are times in which you will have to be really precise while using this feature.
– The Shift Button

One of the seemingly most boring yet most useful buttons on a DJ controller. The shift button when held down changes the function of every button and switch on your DJ controller giving you access to new functions.
Common functions that are associated with the shift button are: hot cue deletion, additional performance pad modes selection, faster jog wheel track search, etc.
– Additional elements that you might find on your DJ controller:
- Deck selection buttons – controllers with more than two mixer channels will feature special buttons on each deck that allow you to control more than one deck in software with use of the same physical deck (and some controllers also let you control two decks at once using one physical deck in so called dual deck mode).
- LCD screens – many modern DJ controllers feature LCD displays that display the currently playing track waveforms, your song library and lots of other useful info (so that you don’t have to be distracted by your laptop’s screen while mixing).
- Jog wheel controls – either jog wheel surface touch sensitivity controls or jog wheel feel adjust (ex. light vs. heavy), controllers with motorized platters might also feature some more advanced torque control.
- Slip mode button – while slip mode is active on the deck all the actions that would affect the track’s position won’t affect it after they end (ex. after moving the jog wheel and letting go of it the track will go back to the position it would be in if the jog wheel wasn’t touched at all – not to the new position set by the jog wheel – just as if the track was still playing in the background and popped into the right position when you let go of the platter) – this affects scratching, hot-cues, loops etc…
- Censor/Reverse button – When you hold down the censor button the track will momentarily start playing in reverse – then when you let go of it it will resume from the moment it should be in if the playback was uninterrupted – the reverse button will work similarly but the track will fall back unless the slip mode is activated.
- Beat grid edit controls – a beatgrid created during the automatic track analysis process might not be perfect especially on tracks with varying tempo – some controllers will feature special physical controls for editing the tracks beatgrid.